
This post is a followup of @AstonJ request here.
We should start with some basis before we talk further - keyboard is in most cases the main hardware we should care, as this is not only our main tool for interacting with machine, but also one of the main source of developers healthcares issues (RSI, finger fatigue, etc.).
Basis
Keyboard components
Each keyboard need at least:
-
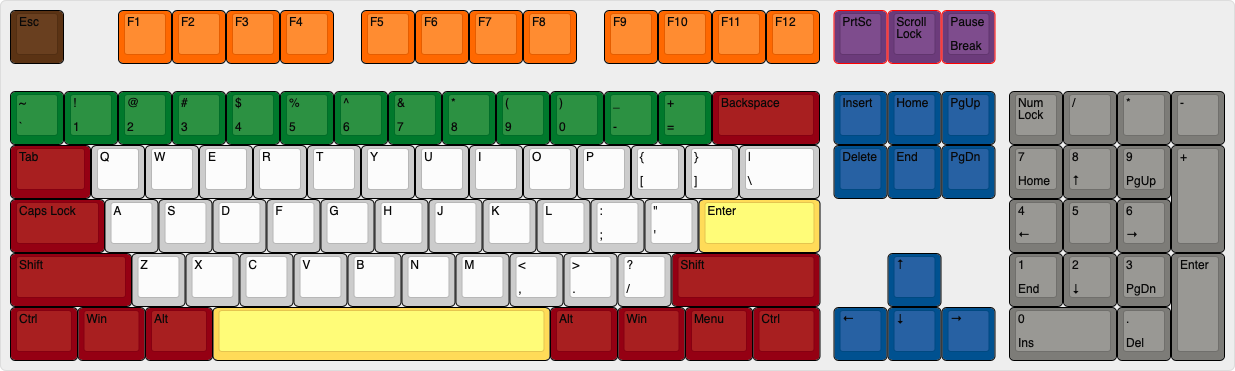
Keys which we split into set of groups:
- Alphas (white) - “main block” of keyboard with letters and symbols on them (but not the numbers above them)
- Numbers (green) - keys for inserting numbers
- Modifiers (red) - space, shift, tab, control, meta, etc. keys which do not insert letters or symbols, but modifies the behaviour of other keys
- Enter and space (yellow) - separate cathegory for them, as these insert white spaces and have often distinctive sizes and shapes
- Arrows and navigation keys (blue)
- F-keys (orange
- Numpad (grey)
- Toggles (purple)
- Escape (brown)
-
Microcontroller - often STM-based or AVR-based (like Arduino) microcontrollers are used
-
Case - you need to wrap your keyboard into something
Often there are also used:
- PCB - for wiring, but there are also hand-wired keyboards out there
- Plate - for keeping keys in place
Categorisation
In keyboard community we have 4 important distinctive features that we can use to define keyboards:
-
Activation mechanism, most commonly spotted are:
- Mechanical switch where physical contact between two copper plates is needed for activation
- Electro-capacitive activation
- Membrane
But keep in mind that there are more mechanisms available, like Hall effect or light activation. More info can be found on Deskthority wiki.
-
Size, which do not fully mean physical size, but more “how many keys are there”. Standard full size keyboard have 107/108 keys (depending on the layout, which we cover later), but there are different sizes. Most commonly encountered are:
- Full Size or 100% with 107/108 keys (as mentioned earlier)
- TenKey Less (TKL) without numpad, but with separate arrow block, functional. block and F-keys
- 75%, like TKL but without F-keys
- 60% only alphas, mods, and numbers
- 40% only alphas and mods
-
“Staggering” which is how keys are shifted between rows:
- Row staggered - like in most keyboards
- Column staggered - instead of shifting rows, columns are shifted for more “ergonomic” layout (ex. Ergodox)
- Ortholinear - no staggering at all
Mechanisms
As mentioned above there are multiple different mechanisms of keyboard activation. In this guide I focus mostly on one - mechanical activation.
Within the mechanically activated switches we distinguish 3 main types:
- Clicky - switches with special “click bar” which gives you 2-way feedback on activation - “bump” when you are pressing a key and audio click. In cross section it looks like this one (image from Deskthority wiki):
- Tactile - switches with already mentioned “bump” but without the click sound, which causes them to be quieter than clicky:
- Linear - where force needed to activation grows linearly on the whole length, so there is no feedback on activation at all:
The direct mechanism can differ depending on the switch producer (the images above are based on Cherry MX line of switches and their “clones”, but there are other mechanisms like Cherry ML, ALPS, or Kailh Box switches).
If you are wondering which one of the above is “the best” then stop, it will bring you no peace, only pain. It is very personal and the war between users of each of them is more fierce than Vim vs other, obviously worse, editors </sarcasm>.
Keycaps
Each keyset has defined it’s profile, or another way - shapes of the keycaps.

Image courtesy u/jacobolus at Reddit
In addition to the profile, the important things are material:
- ABS - most commonly used material, very versatile, available in many colours (event transparent), quite easy to work with, etc. Almost perfect except one thing - it reacts with acids which mean that in time it will “shine”. In addition to that UV light make it yellowing with time.
- PBT - much harder to work with, less colours, but do not react with acids and shine will take much, much longer and do not respond to UV light keeping it’s colour for much longer.
And the way the legends (symbols) on keys are presented on the keycap:
- Pad printing - just dipping ink on keycap, most popular on most commercial keyboards, cheap, but wore out quite quickly
- Laser etching - few different techniques are used there, but almost all share the same disadvantage - it catches dirt as this creates rough surface on the keycap
- Dye sublimation - impregnating the material with dye, this is much more resilient than pad printing, but the disadvantage is that it can be used only to print darker images on lighter material as it “penetrates” material changing it’s colour
- Double cast - you have two moulds, and one has empty spaces where legend will need to be and another fills the legends. Most expensive and most resilient way of creating legends
It is important to know the sizes of the keycaps you will need. Especially with the bottom row, which sometimes aren’t very standard (especially in “gaming keyboards” from Corsair or Razer). The standard one in “classical keyboard” are 1.25u, 1.25u, 1.25u, 6.25u, 1.25u, 1.25u, 1.25u, 1.25u (where 1u is width of “regular” keycap) and general layout (ANSI vs ISO, i.e. long enter vs reverse L enter).
This is part 1 of the guide, which I will try to expand in future with materials about stuff like firmware and more about hardware of building and using your own custom keyboards.